FXRack Tutorials
FXRack Guide
Use FXRack to record audio, build effect chains, edit samples, loop clips, export audio, and control the app from MIDI gear or other music apps.
Quick Start
- Open FXRack.
- Choose a session preset from the Session control, or start from Clear.
- Choose an input source from Device, Record, File, Library, or Paste.
- Record, import, or load a clip into the main rack.
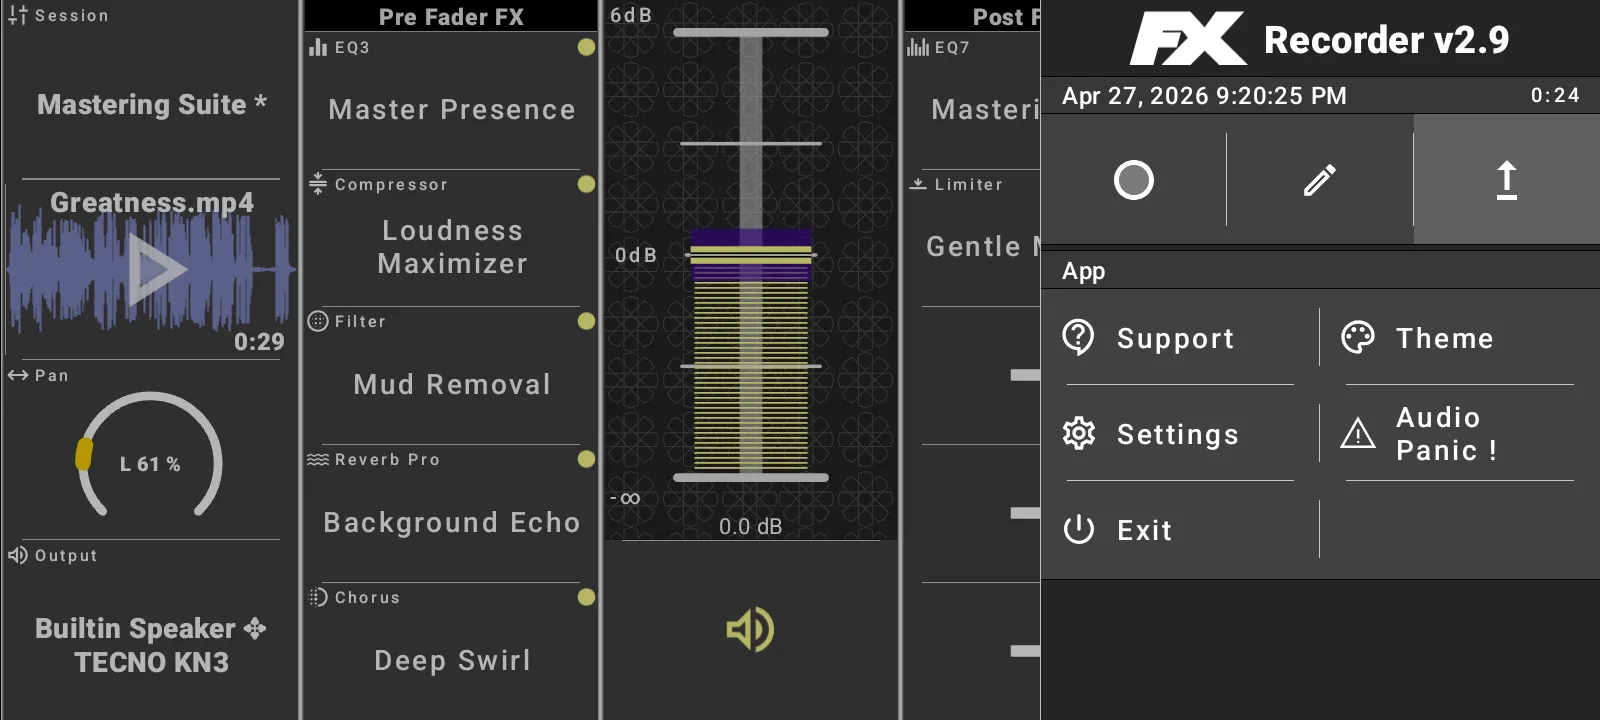
- Adjust Pre Fader FX, track level, Post Fader FX, and master level.
- Use the side panel when you need the app sampler, export, settings, MIDI, theme, audio panic, or exit.
Choose A Rack Session
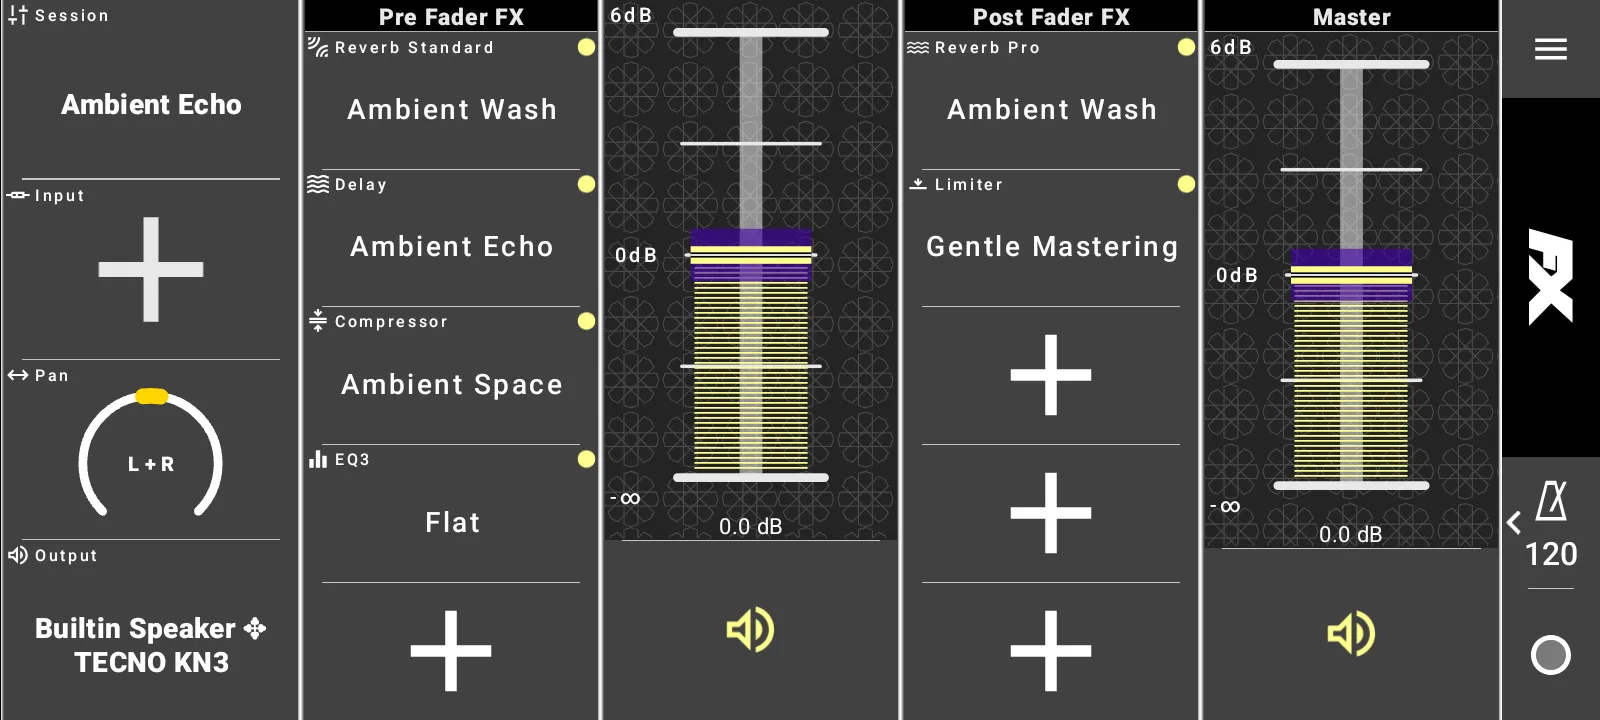
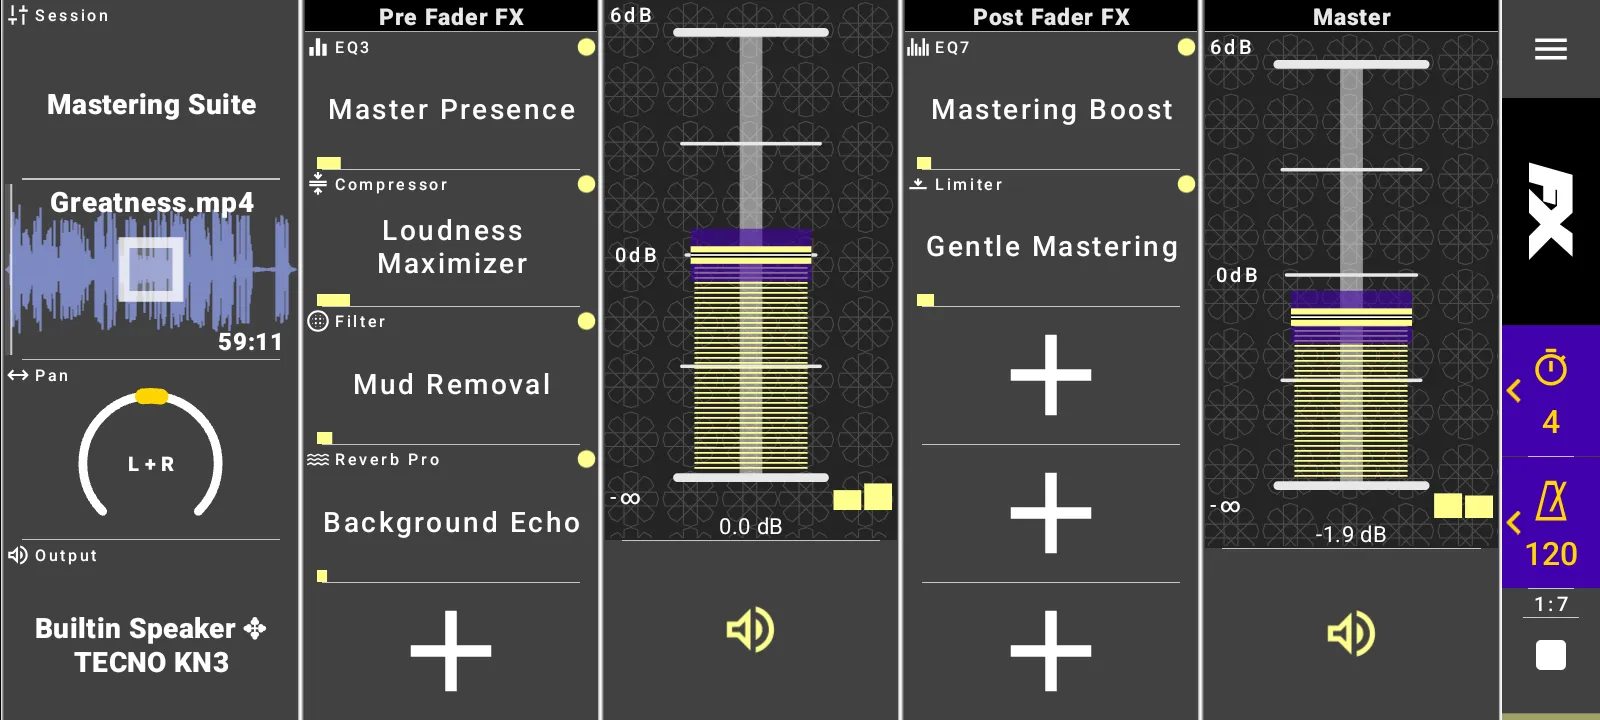
Session presets load complete rack setups. Built-in sessions include Podcast Clean, Rock Guitar, Ambient Echo, Vocal Warmth, Studio Magic, Live Performance, Drum Room, Electric Energy, Acoustic Serenity, Synth Dreams, Bass Booster, Vocal Clarity, Guitar Crunch, Orchestral Touch, and Mastering Suite.
When you change a loaded session, FXRack marks it as modified so you can tell the current rack no longer matches the saved preset exactly.
Select Input Or Record
The Input selector is where audio enters the rack.
- Tap Input.
- Choose Device for live microphone or interface input.
- Choose Record to open the main track recorder.
- Choose File to import media through Android's file picker.
- Choose Library to load a stored app sample.
- Choose Paste when a clipboard sample is available.
Device input can be Off, Stereo, or Left for the built-in microphone. Monitoring volume and mute are separate from visible input metering, so you can mute monitoring while still checking levels.
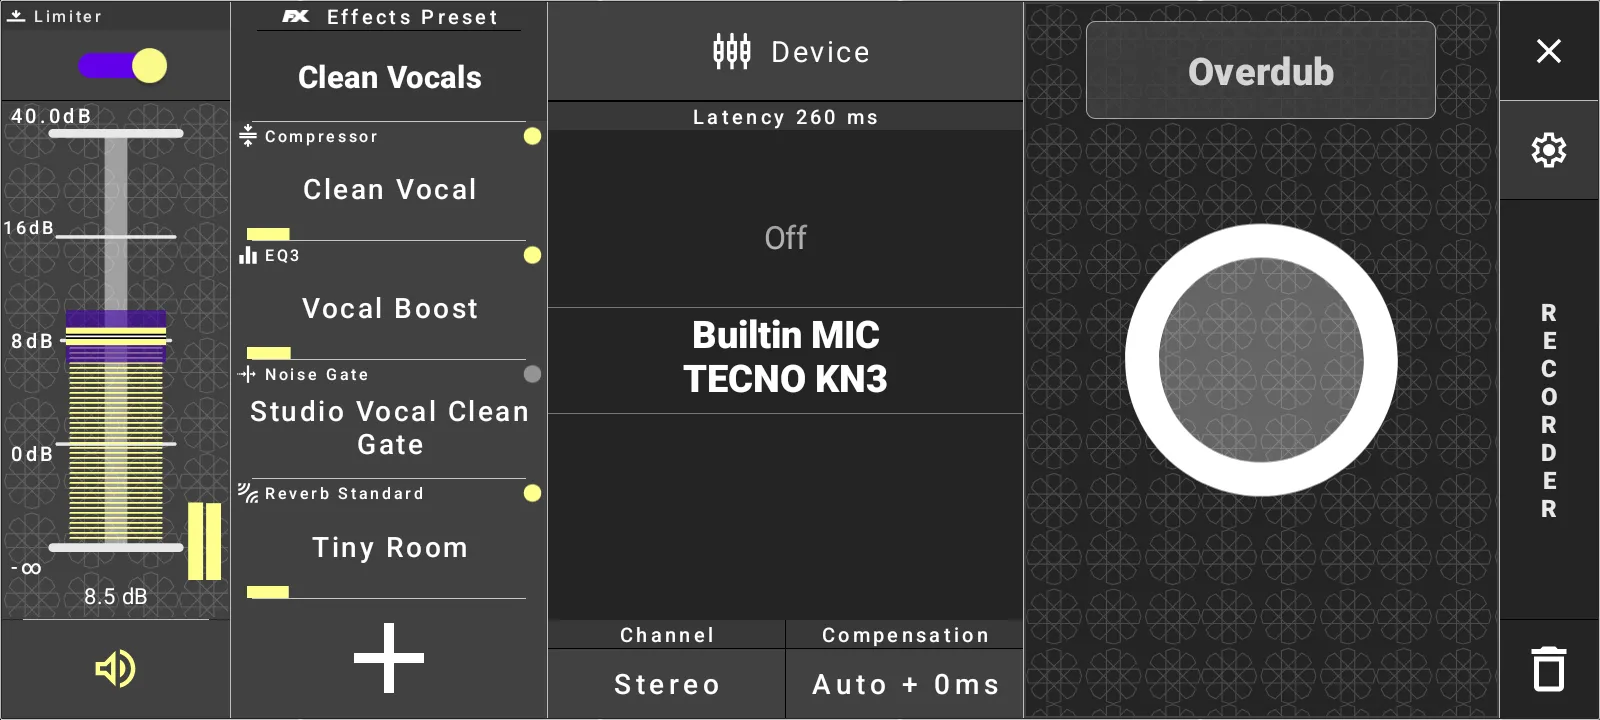
The main track recorder supports input limiter, input level, input mute, channel selection, input effect presets, latency compensation, record, overdub, accept, and revert. Use latency compensation when recorded audio needs to line up with playback.
Play And Route A Clip
Loaded clips appear as a waveform on the main rack. Use the waveform area for playback and take confirmation, then adjust track and master levels around it.
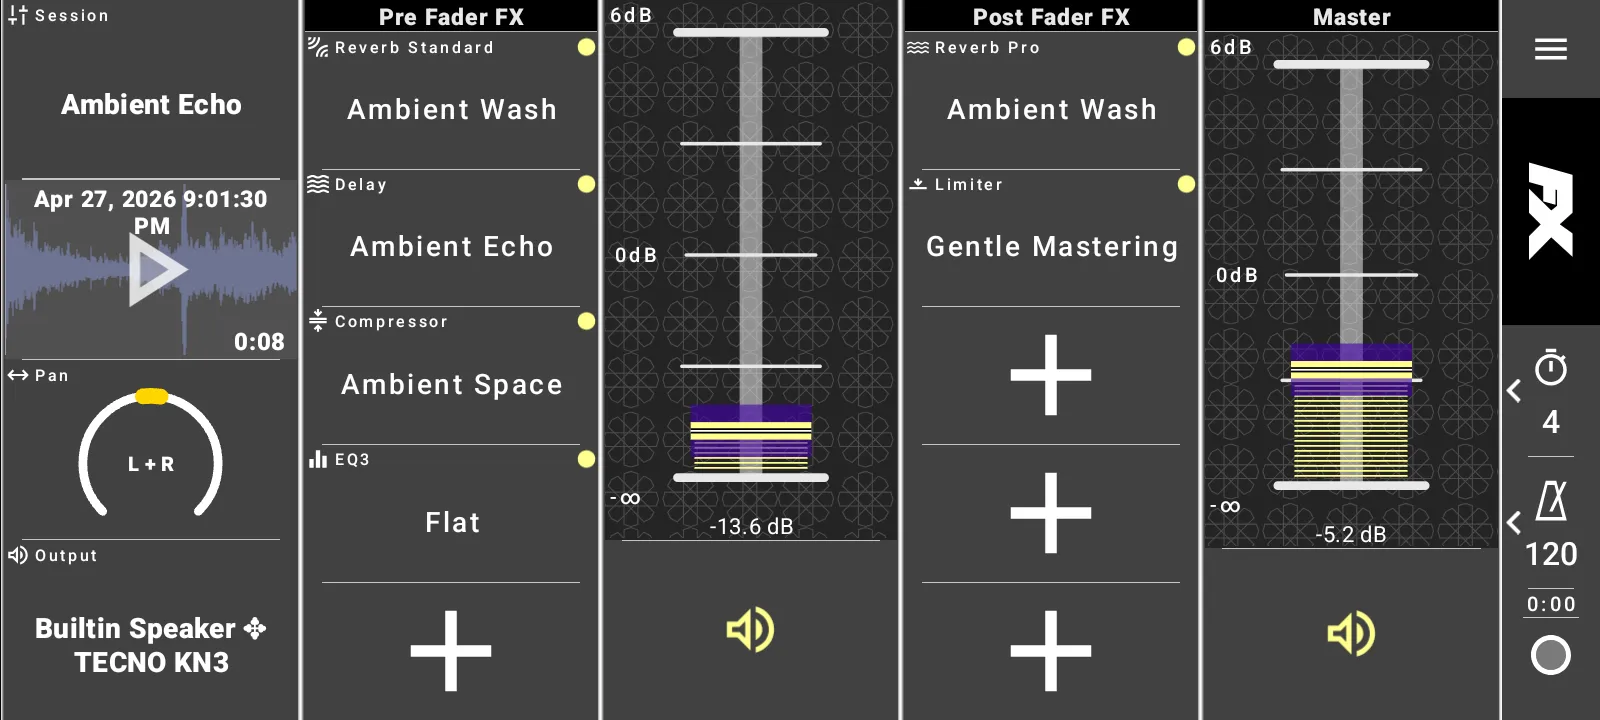
The right toolbar exposes sync time and BPM controls. The configuration panel also gives you pan and output device selection, including Automatic and explicit outputs such as Builtin Speaker.
Edit A Sample
Open a clip in the sample editor when you need detailed editing.
- Use the waveform to zoom and scroll.
- Set Position, Start, Offset, and End markers.
- Assign BPM when the clip should use beat and bar timing.
- Switch marker display between Beat and Time when BPM is known.
- Enable Restart or Loop when the sample should restart or repeat.
- Open ADSR to shape attack, decay, sustain, release, and loop transitions.
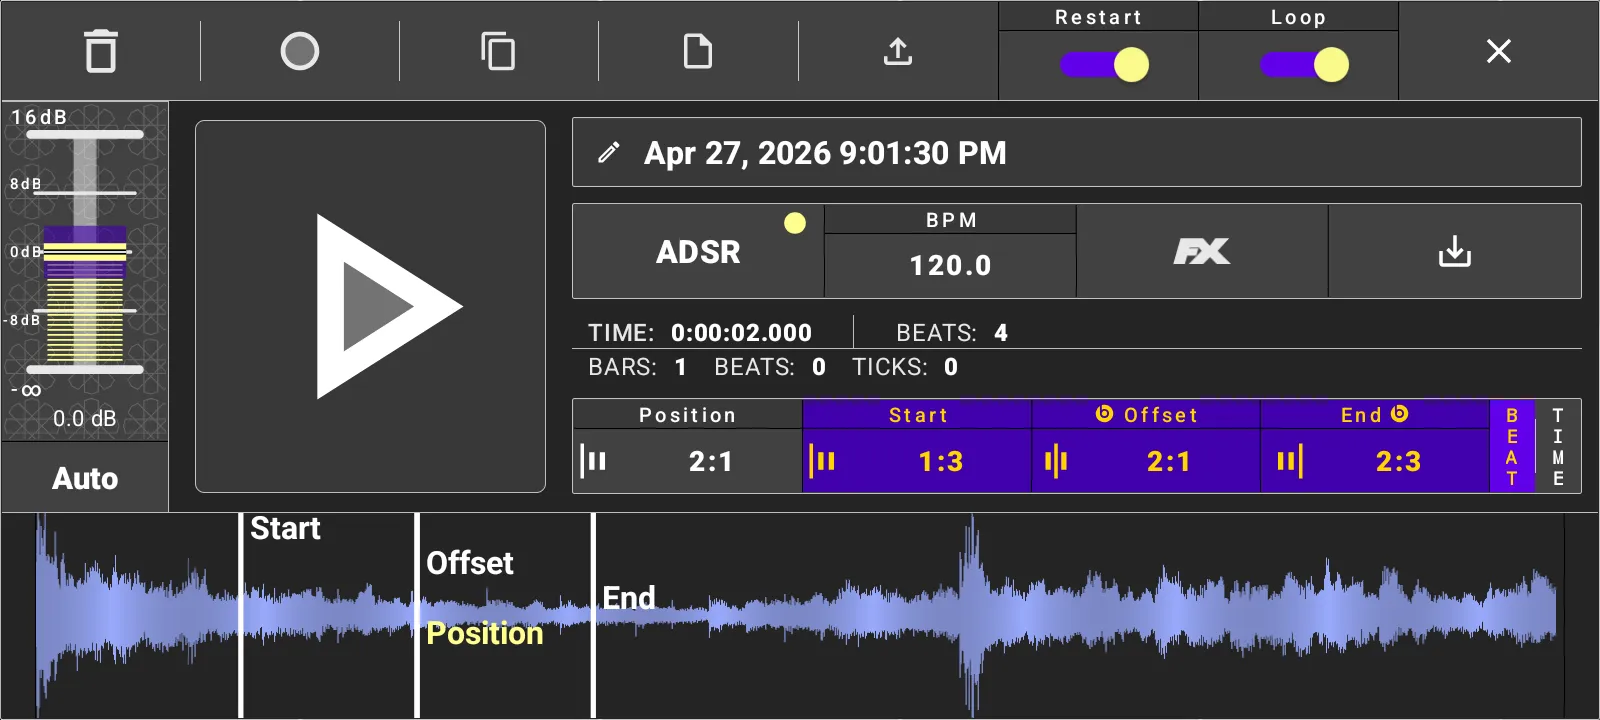
The editor also supports clear, record, open, copy, paste, export, clip-level FX, and render-and-replace workflows.
Import, Library, And Clipboard
File input opens the Android file picker. FXRack can load supported audio and extract audio from video files while showing import progress.
Use Library to select stored app samples or remove samples you no longer need. Use Copy in the sample editor to place a sample on the app clipboard, then Paste to load it into another compatible target.
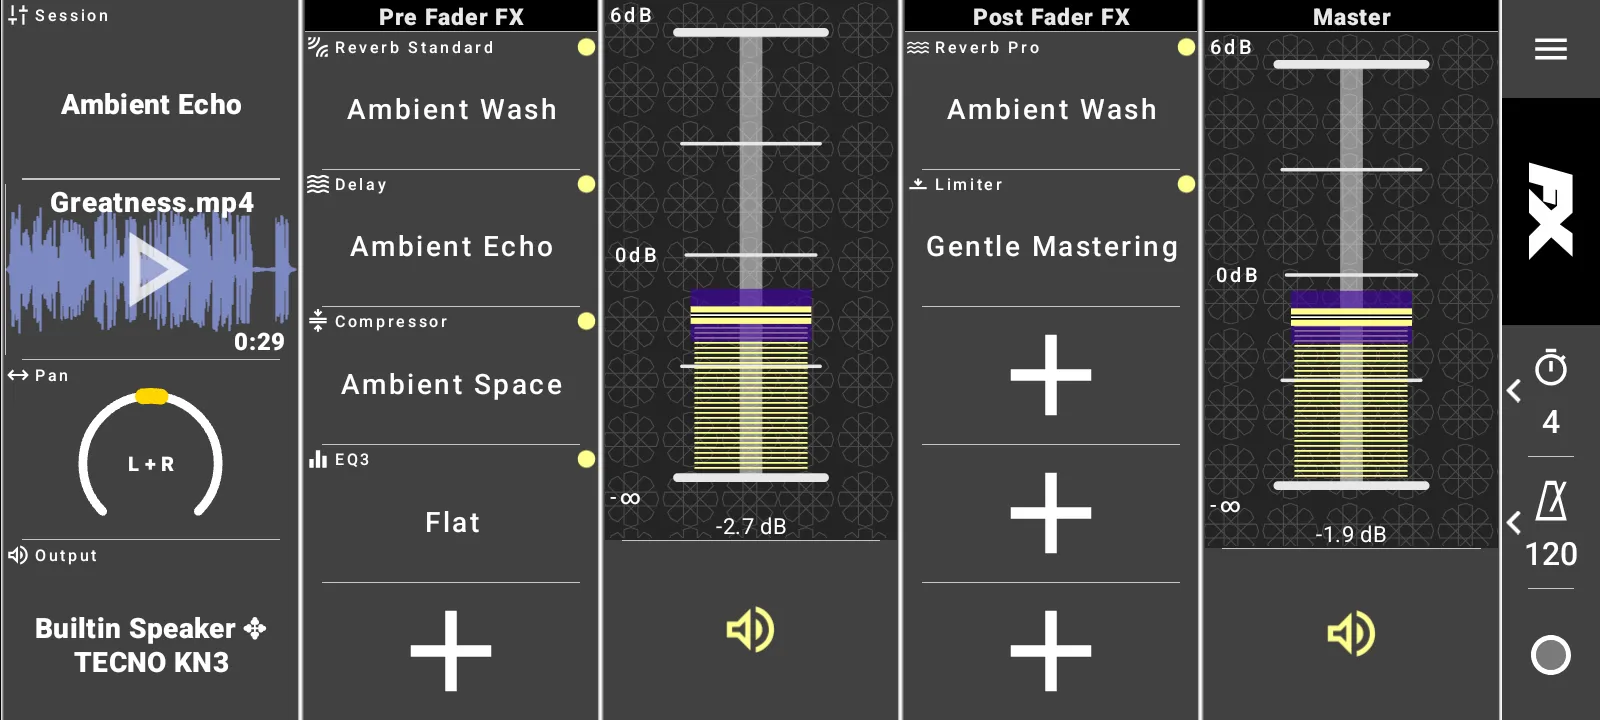
Build Effect Chains
The main rack has Pre Fader FX and Post Fader FX sections. Each section shows five visible effect slots.
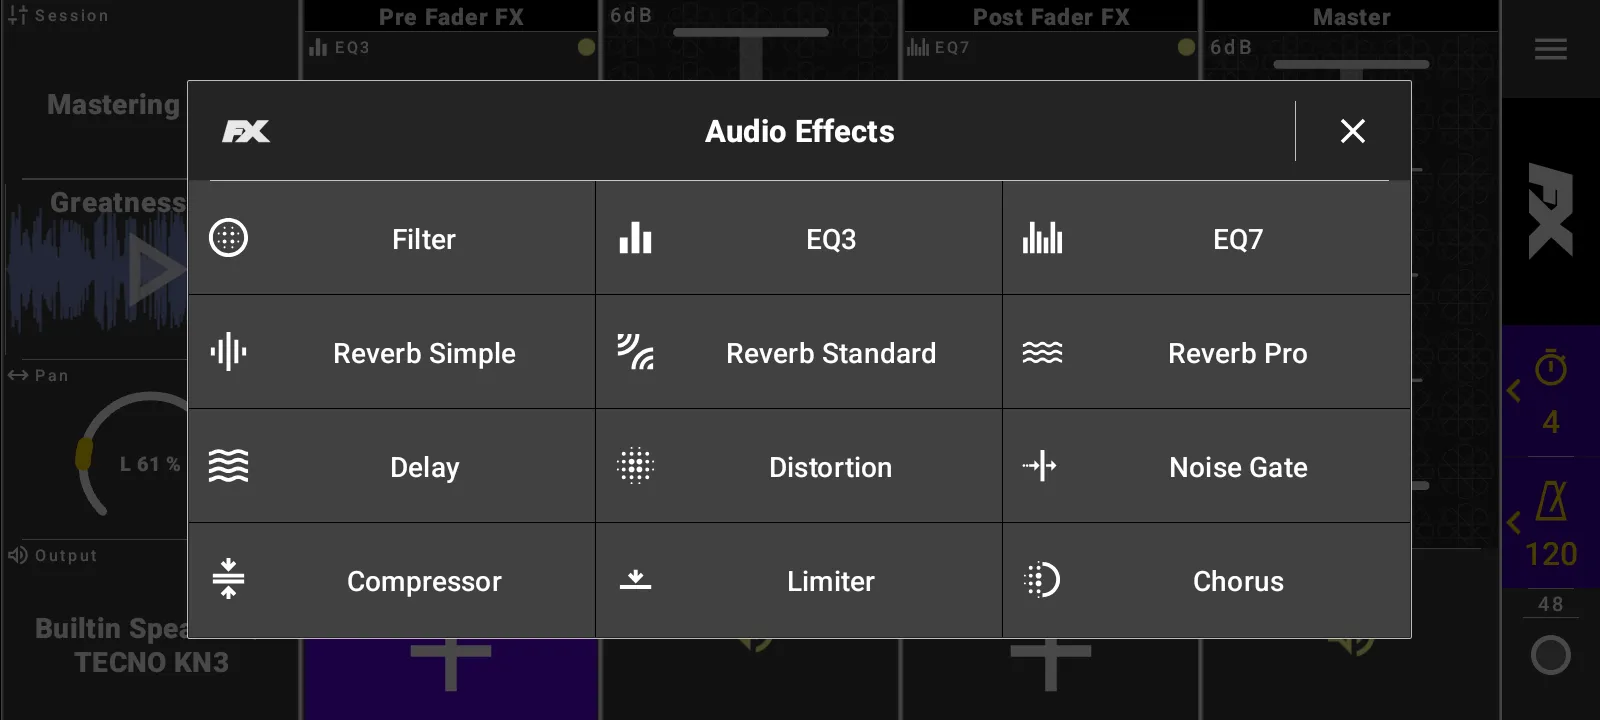
- Tap an empty effect slot.
- Choose Filter, EQ3, EQ7, Reverb Simple, Reverb Standard, Reverb Pro, Delay, Distortion, Noise Gate, Compressor, Limiter, or Chorus.
- Choose an effect preset.
- Adjust effect parameters directly.
- Long-press a set effect slot when you want to clear it to Off.
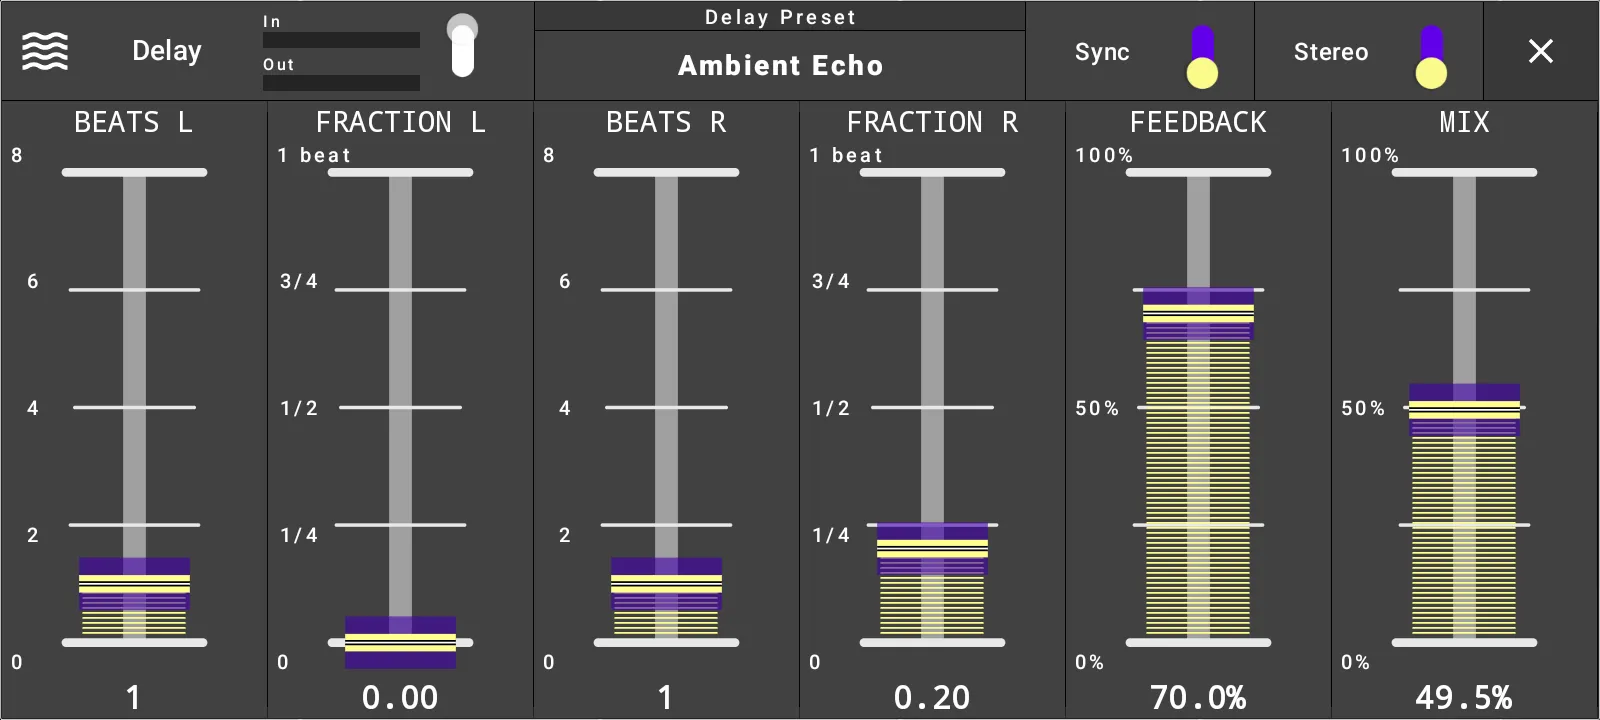
Effect editors expose large parameter controls, enabled state, preset selection, and meters where available. Delay can use beat-synced timing or millisecond timing, Distortion has type selection, and Limiter has look-ahead selection.
Render Clip Effects
Sample editor FX are clip-level effects. Use Render and Replace when you want the enabled effects written into the audio file. FXRack asks for confirmation before replacing the audio, then keeps the rendered waveform loaded.
Use The App Sampler And Export
Open the side panel for the app sampler. It has recording, editing, library, and export workflows separate from the main track recorder.
The export tab lets you choose audio format and bitrate before exporting sampler audio.
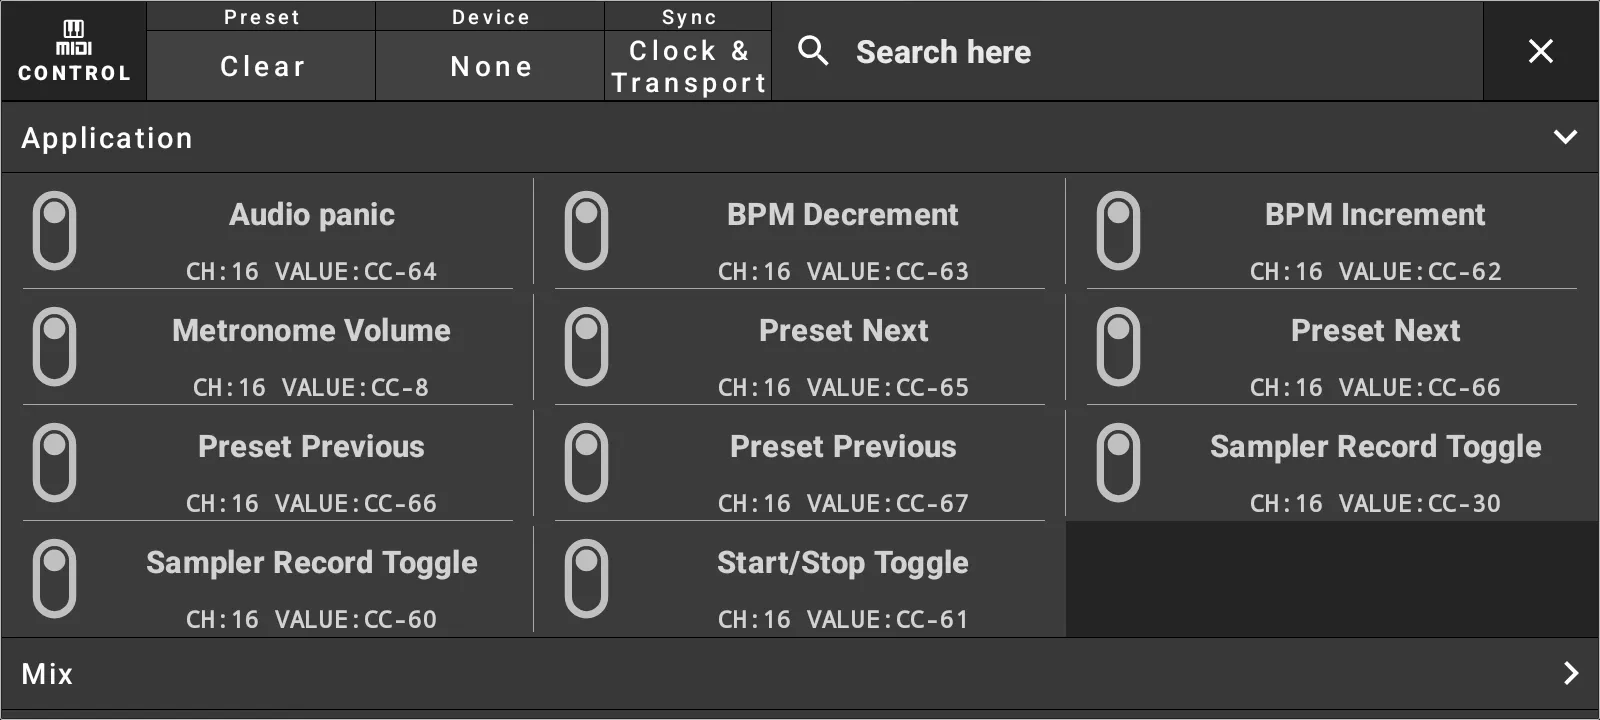
Control FXRack With MIDI
Use Settings, then Control, when an external MIDI controller should control FXRack.
- Select a control preset.
- Choose a MIDI input device.
- Open a mapping section such as Application, FX, Mix, or Controller.
- Enable the mapping and choose channel, type, and index or value.
- Use Learn to capture an incoming MIDI event.
- Use Test to verify the mapping.
Application mappings include Audio panic, BPM Increment, BPM Decrement, Metronome Volume, Preset Next, Preset Previous, Sampler Record Toggle, and Start/Stop Toggle.
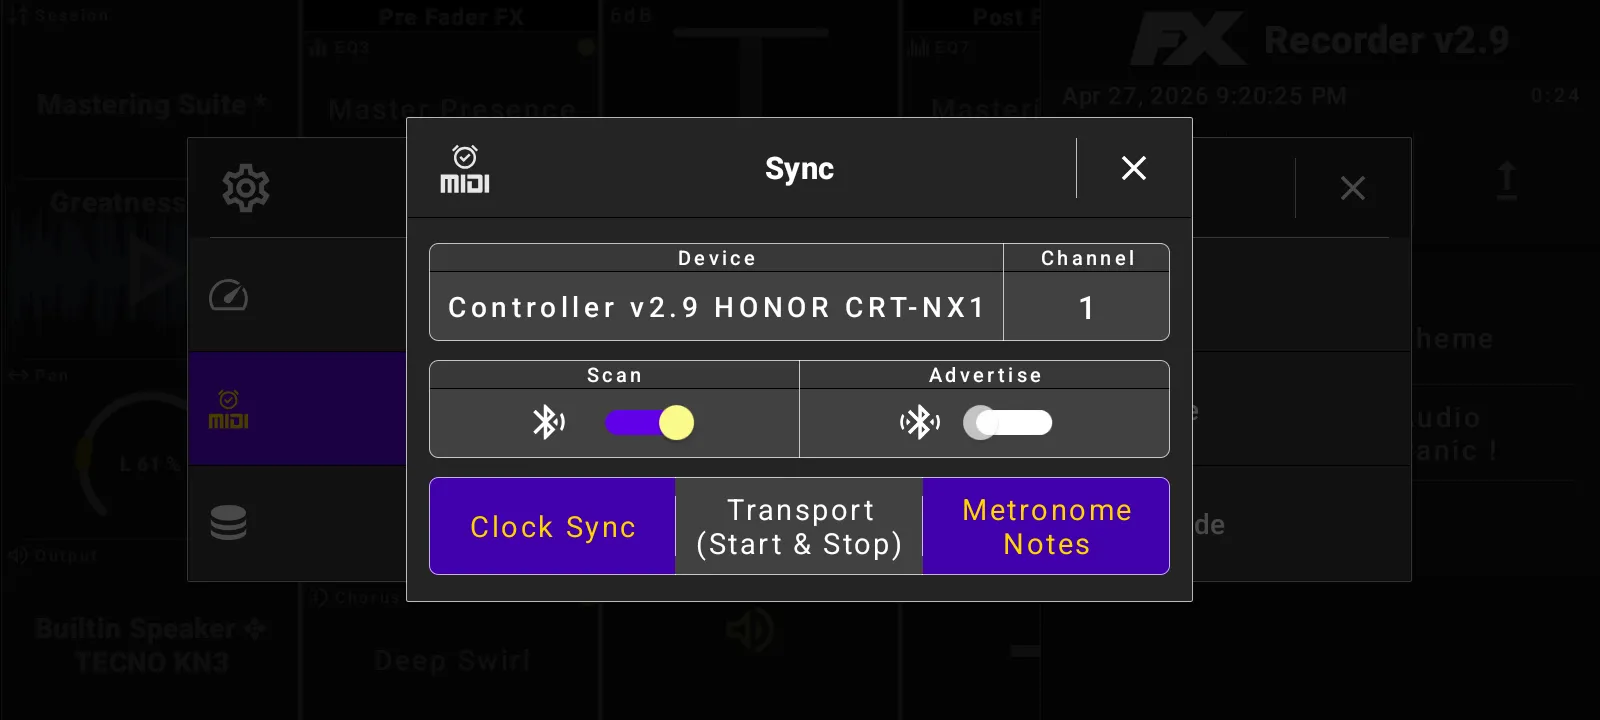
Sync With MIDI Output
Use Settings, then Sync, when FXRack should send timing to another app or MIDI device. Select an output device and channel, then enable Clock Sync, Transport Start and Stop, and Metronome Notes as needed.
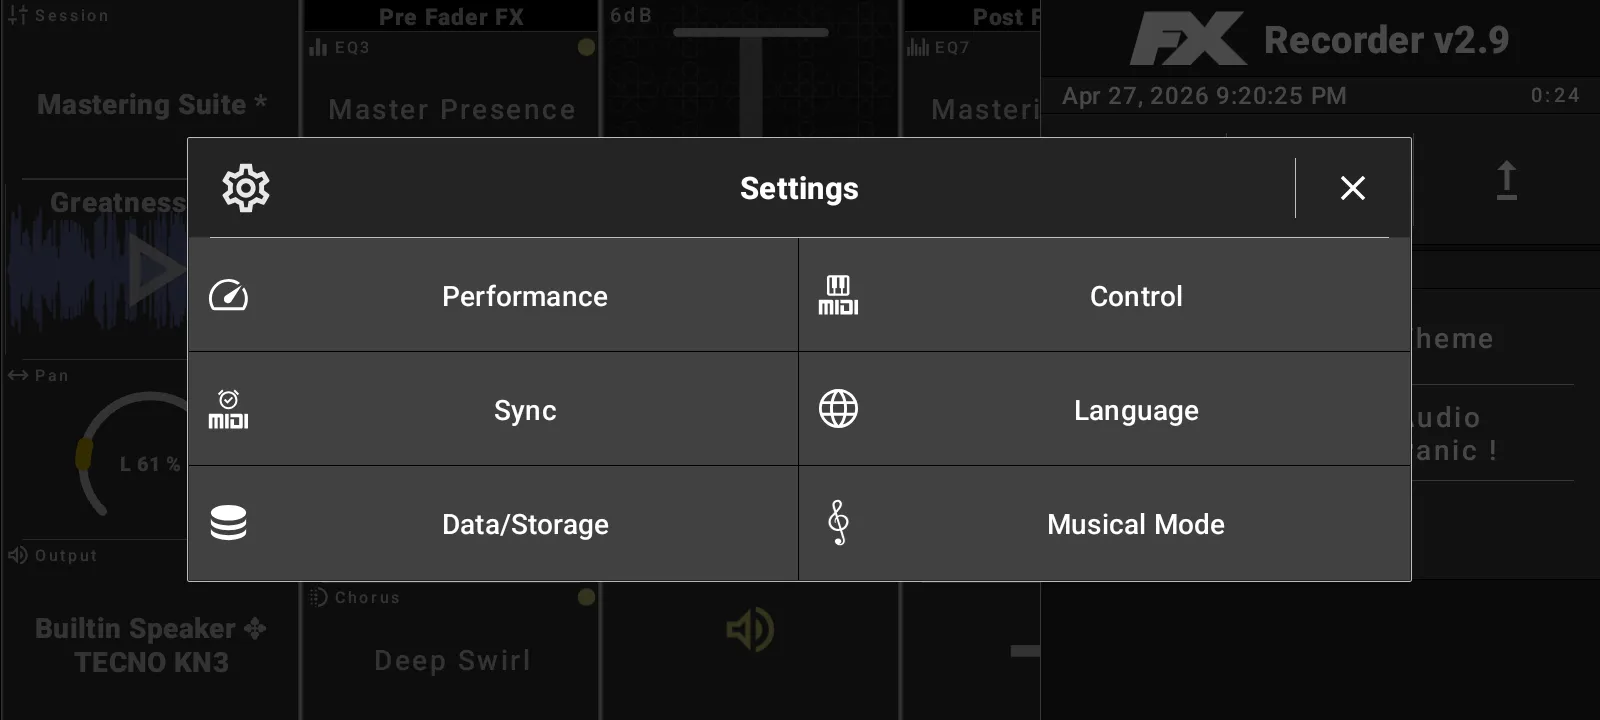
Customize Settings
Settings includes Performance, Control, Sync, Language, Data/Storage, and Musical Mode.
- Performance provides Max Compatibility, Medium Performance, Max Performance, and Manual modes.
- Manual performance settings include audio output, audio input, and reset application state.
- Audio output settings include performance mode, buffer size, output sharing, and sample rate.
- Audio input settings include performance mode, preset, buffer size, input sharing, and processing mode.
- Data/Storage supports export, import, and audio storage format preferences.
- Musical Mode switches between Beats and Bars and sets the time signature.
Theme choices include System, Light, Dark, Blue light, Blue, Gold, Wood, Pastel Light, and Sepia.
Use Notification Controls
When playback or recording is active, Android can show a foreground notification. FXRack notification controls include playback/metronome toggle, master mute, record, and exit. The notification title follows the current session preset.